Make your own space suit
Pages in this sectionWhat astronauts wear in space
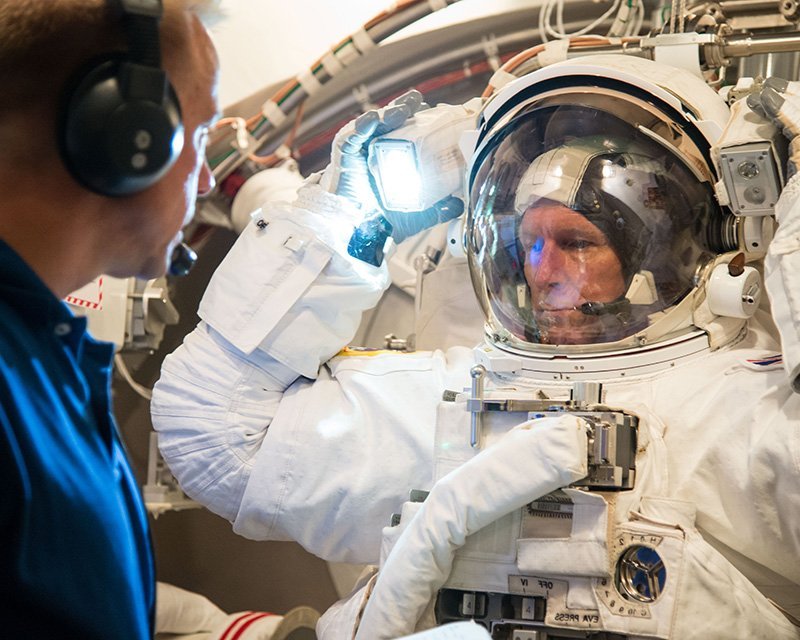
Astronauts wear two types of space suit. The Sokol suit is worn during launch to, and return from the International Space Station (ISS). The Extra Vehicular Activity (EVA) suit is worn for space walks.
Why astronauts need Sokol space suits
Launch and landing are the two most dangerous times for an astronaut. When the Soyuz spacecraft launches the pressures and forces can potentially cause damage to the craft, allowing the atmosphere inside to leak out and exposing the astronauts to the vacuum of space. On re-entry, with temperatures of around 1600°C acting on the entry module, similar problems can arise.
The Sokol suit is essentially a survival suit. It’s designed purely to keep an astronaut alive long enough for them to quickly fix the problem, or get back down to Earth. The suit can support life for up to two hours in the vacuum of space.
Why astronauts need EVA space suits
If an astronaut is going to do a spacewalk outside the ISS, they need to be protected from the extremes of temperature, vacuum and lack of oxygen. The EVA suit with its many layers, large tinted helmet, chunky boots and gloves does just this, preserving the life of the astronaut as they work outside the ISS.
Make your own EVA space suit
What you'll need
- White top
- White trousers or Tyvek overalls
- Gloves
- Silver duct tape
- Coloured sticky tape
- Fabric glue
- Cardboard
- Cardboard tubes
- Cereal box
- Two 2-litre drinks bottles (alternatively use crisp tubes or lengths of poster tube)
- Double-sided tape
- Adhesive velcro tape
If you have no spare white clothes (check first with whoever buys your clothes), Tyvek overalls are a good alternative. You can buy them online or from a good hardware shop for about £5.
Look carefully at the space suit to see where you might wear additional tubing around your limbs. Put on your white clothing and ask someone to help apply tape around the joints and along the zip lines like the space suits Tim Peake and other astronauts wear. Bend your legs and arms when doing this, or you may find it difficult to bend them afterwards!
Real astronaut gloves need to retain and deflect heat, but yours just need to look like they do. Take your gloves and use the duct tape to cover the knuckles and cuffs of the gloves.
The cereal box will be the air tank worn on your chest. The bottles will be fuel cylinders worn on your back. Paint the whole cereal box white. Line the 2-litre bottles with white paint, by pouring some inside and then rolling them carefully so they are completely coated. Leave to dry.
Lie the two plastic bottles down side by side and tape them together using two long strips of duct tape.
Use the velcro tape to attach and remove the the air tank and fuel cylinders to your space suit.
Tip: Ask hardware stores, plumbers, and DIY fanatics for any spare bits they may be able to give you for your suit, such as flexible hose or tubing.
Make your own space helmet
For the simplest helmet, use a head-sized cardboard box, with a hole in one side to see through. Cover in white paper or paint with PVA glue and white paint, and add plastic tubes and details to make it realistic.
Our spherical helmet takes longer to create, and you may need an adult to help with more complicated parts.
What you need
- Large balloon
- Black felt-tip pen
- Old newspaper
- Plain white paper
- Wallpaper paste (or flour and water paste)
- Optional extra: visor
- 2-litre plastic drink bottle (with smooth sides)
- Glue gun (adult supervision required)
- Wide sticky tape
What to do
Draw on the balloon where you want the visor. Draw another line around the balloon for the neck opening.
Sit the balloon in a jug or plant pot and cover the balloon with three layers of papier-mâché, leaving the visor and neck holes open. Allow drying time between each layer of papier-mâché. If you don’t want a visor on your helmet, finish it off with a fourth layer of completely white papier-mâché.
If you want your helmet to have a visor, cut the ends off the plastic bottle to make a cylinder. Then cut a straight line down one side of the cylinder to make a rectangle. Trim as necessary so that it covers the visor opening of the papier-mâché.
Ask an adult to help put hot glue across the top of the visor opening with the gun. Allow the hot glue to cool so it doesn’t melt the plastic. Attach the visor by pressing the long edge of the plastic firmly against the glue.
Papier-mâché over the edges of the visor, and give the helmet two more layers. Make the final layer completely white.
Wait for the helmet to dry completely before popping the balloon.
Trim the base of the helmet so it fits over your head.
Remember to decorate the helmet with Destination Space and Principia Mission badges, which you can download from our Mission supplies.